Showing posts with label DIY. Show all posts

Saturday, December 4, 2010

Necklace DIY: Bridesmaids' gifts?

So yes, I am totally obsessed with necklaces right now. I have also been wondering what I should get my bridesmaids. I want to get them something that will be useful and can be individualized but perhaps could also be used at the wedding. In other words, I'd love to pay for something so that they don't have to... With that in mind, I've started looking at possible DIY bridesmaids' necklaces. I found a bunch of necklaces on Etsy that look DIY-able.

1. Simple and Understated

{Etsy - $44}
The thing I love about this necklace is it looks super simple to make, plus it'll be cheaper to make because it only uses 10-12 beads per necklace. I also think the flower looks pretty easy to make... you could also make if fancier by adding a crystal button to the center of the flower or adding a few crystal beads between the pearl beads.

Here is a flower DIY project that I've posted before that I think would work great for this necklace.
{DIY Instructions}

2. Feminine and Fabulous

{Etsy:Mara Necklace - $36}

This necklace has a little bigger pearl beads and the flower is a little larger. It is also more like a floral poof than a flower. The color makes it so hard for me to figure out this necklace. I think I like the general idea, but I would probably use smaller pearls.

Here is a floral poof DIY that I thought would work great for this necklace:
{DIY Instructions}

3. Elegance and Shine

{Etsy - $88}
I love love love this one. I love the crystal beads in between the pearl beads, I like the symplicity and bling in the flower and most of all I love that there are two strands of pearls. While this would be the most expensive necklace to make I definitely think it would be worth the extra $$.

I've also posted this chiffon flower DIY project before but I thought it would be perfection with this necklace, especially in the soft pink!
{DIY Instructions}

As for the beads, it looks like you can order beads for a reasonable price. At Fire Mountains Gems or Oriental Trading. If you prefer to pick some beads up in person I know that Michael's has a considerable collection but I think they are fairly pricey.

What do you think? Would you wear there necklaces? Would your bridesmaids?

Saturday, November 27, 2010

DIY Necklace

Recently I blogged about my love of statement necklaces. I have been keeping an eye out for the perfect piece but haven't found anything purchase-worthy, so like any crafty-bride-to-be I started searching for DIY options.

There are SOOO SOOO SOO many DIY pearl necklace tutorials available on the internet but I've filtered through a couple dozen and found my top favorites, which I picked because I thought the necklaces were cool, the inspiration was on point, and the instructions were fairly clear.

I think I may actually try to make my own necklace. One of the best things about living in NYC is the fabric district, it's called that but it's actually a source of all things crafty, from beads, lace, and ribbon, to crystal buttons, and feathers. Basically anything you would need for an arts and crafts project you could find in bulk in the fabric district! That being said, I figure I could make a list of the supplies I'll need and bring them with me to Amsterdam, this def seems like a travel friendly DIY project that I could work on overseas.

Here are some of my favorite DIY posts from around the blogosphere:
{Source: instructions}

{Source: instructions}

{Source: instructions}

{Source: instructions}

{Source: instructions}


{Source: instructions}


I haven't quite decided which one I love....which are your favorites? Have you ever made your own necklace? Am I in over my head??
Wednesday, November 17, 2010

Design + Inspiration

Awhile ago Miss HoneyBear shared a link to free tape clip art which I have been dying to use, so here it is! I am still pretty bad at paint.net and can't figure out all the layers but I think they turned out alright.

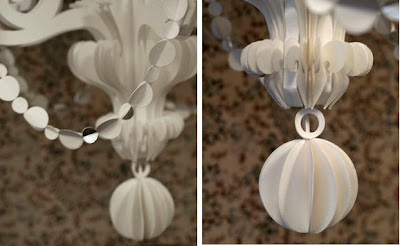
As you can see I am also still pretty obsessed with things hanging from the ceiling! I am not entirely sure if I prefer flowers or those clear balls but they are all so pretty.

{Source}

{Source}
*For DIY instructions click here


I like the way the balls look like bubbles. It reminds me of that scene in Cinderella....(I heart Disney). I've been starting to really consider bubbles instead of petals or confetti at the wedding. I love the idea of the having bubble guns (so I can really get the volume of bubbles I want plus I don't want weird blowing pictures...hehehe).

Now how would I go about making a bubble gun look wedding appropriate?!!? I think it may require more than just ribbon... but who knows.

Tuesday, November 2, 2010

200 days left...

Where did the time go?! There are now less than 7 months until my wedding... it seems like it was just yesterday that I was saying “I’m not worried, I have 14 months to plan…” Sigh.

That being said, things are going well but I think it’s time for me to order invitations. I will be moving to Amsterdam for the semester in January so I would really like to get my invitations assembled and addressed before I leave. Finals start the second week of December so I need to have all the pieces before December and then I can assemble after finals, between Christmas and January 8, when I leave.

In addition to my love for letterpress, I have fallen head over heels in love with boxed invitation suites. I first saw these boxed suites on Wedding Chicks and fell in love.

{source}


But I was obviously worried about the DIY-ability of these suites, not to mention the mailing costs! Then I headed to the Bee and found Miss Perfumes gorgeous boxed invitations.

{source}

Although Mrs. Perfume didn't DIY her invites she did assemble, wrap, and address (label) all the boxes, and from the look of things she had twice as many as I will need. But I was still really apprehensive. It just seemed like a lot of work, on top of being a full time law student, working part-time as a nanny of four kids, and a research associate at the Vale Center on Sustainable Investment, I have a take-home midterm due in two weeks, my MPRE (Multi-State Professional Responsibility Exam) this weekend!

But then I saw this on Green Wedding Shoes. Not only are the pieces amazing, but its a New Orleans wedding. Let's just say "I know what it means"...


{source}


I try really hard to avoid this term because it is so overused on wedding blogs but these invites are SOO SWOON-able! I'm hooked. So this weekend my lovely bridesmaid LA, is coming back in town and we are gonna start throwing out ideas and making mock-ups! I am SOO excited.

Monday, October 18, 2010

Best of Ruffled DIY Contest

I've been keeping a close eye of Ruffled's DIY contest entries few weeks and to be honest, I haven't been that impressed. A number of the projects are just not that original and the rest of them aren't that creative. Unfortunately this is probably more a reflection of the time I've spent on wedding blogs and doing DIY research, than the quality of the submissions. Here are a few that I thought were actually useful/creative DIY projects.

1. Doily Paper Laterns

{DIY Instructions}

I actually saw these lanterns on Etsy at June Petals a few months ago. I even bookmarked the store! I am super excited about this DIY project because I already own way too many doilies!

2. Hot Chocolate & Marshmallow Favors

{DIY Instructions}

I am not having a winter wedding but I think this idea is really adorable. I think these would so adorable for a destination wedding at a ski lodge.

3. Thank You Garden Seed Package


{DIY Instructions}

Once again, I don't think these would be appropriate for my wedding but would be so adorable at a garden wedding. I generally like DIY projects that include printable templates.

Tuesday, October 12, 2010

StDs - Designed/Delivered Part III

I apologize for the delay in this post. Here are my DIY save the dates...TA-DA!


After my huge black pen fiasco I regained my self-confidence and decided to try again at handwriting all the addresses. I got a couple of white gel pens from Michael's which I think look a million times better.


I didn't have it in me to hand write all the return addresses so we just printed them on transparent labels and stuck them on the back. We also used a little piece of fancy fabric tape as a finishing touch.We were originally going to use seals but they ended up being a little big for the envelopes. Hopefully I'll be able to use the seals on the invitations.


Then I put them all in gallon ziplock bags to protect them from the elements until they were safely in the hands of the USPS.

Sunday, October 3, 2010

StDs - Designed/Delivered Part II

After designing the StDs, the next step was to line the envelopes. We went to Paper Presentation and picked up some high quality brown kraft paper envelopes and loads of scrapbook paper I clearly couldn't pick just one so I picked up everything that caught my eye. D picked the one with the pink elephants.

Then a traced an envelope onto some cardstock to make a template.

Once I had the basic size of the envelope it was easy to figure out the size and spacing I wanted for the liner.
Then I cut out the template and just traced it onto the paper. This is actually the back of the paper. D was in charge of the cutting and the stuffing. Then I did all the gluing.


Here's what they all looked like when they were done!
Super easy and the whole project envelopes and paper cost a little less than $50.

Thursday, September 30, 2010

StDs - Designed/Delivered Part I

As previously mentioned, my StDs finally went out on Monday... and people have already received them. I thought it would be a good time to share my STD process.

The StDs were designed and printed in Stamford, Connecticut about a month ago. I took the Metro North up to Stamford and met with my bridesmaid L.

Immediately, L got to work in her home office. (She does this for a living!)

This is me giving her a thumbs up! I was pretty useless. At some point I just have so many ideas that I become indecisive so I just provide general statements of approval.

We finally got them printed!!! This is LA checking out the prints and making sure they were consistent, making sure the black was black and all the edges were clean. I love that my friends are perfectionist just like me :D

Then she cut and whole punched the individual save the dates! She punched little semi-circle notches in the side of the StDs because we tied a piece of twine around each invite... as a mnemonic device of sorts since we used "Tying the Knot".... I know it's a little cheesy but I liked it :D

Because were were ignoring her cat, he made sure to remind us that he was around!

My job was to put holes in the calendars for the little heart shaped brads.

They really turned out great and I'll post the final invites soon enough.

Tuesday, September 7, 2010

DIY: Chandelier Part 2


Last week, I blogged about not being able to find a good DIY chandelier tutorial but then I stumbled across this little tutorial on Craft Stylish.


While I think this may involve much much more manual labor than I am up for, I really like the paper crystals. I feel like these could be cool if you did strings of silver and white paper crystals and some strings of tissue paper flowers... that could be kind of pretty blowing in the wind, right?

Friday, September 3, 2010

DIY: Bridesmaid Invitations

So this was my very first completed DIY project... It took almost 5 months to complete! To be fair I did it in three parts and I had to wait for all my bridesmaids to receive them before I could blog about it so here it is:

PART I:


Supplies:
* 6 pink tank tops with lace detail from Forever 21 - $6.50 each
* 1 white tank top for ME!
* Fabric Puff Paint - Light Pink, Medium Pink and Silver - Free (a gift from my MOH)
* Printed Templates (which I just printed on my computer)


Then we (my MOH) slid the template under the shirt and traced the text with the puff paint! (We actually did a bunch of test runs and discovered that she was much more consistent than I was so we decided it would be best for her to do them :D )


We just put them in the window to dry. It takes about four hours for puff paint to dry completely.


This is the bride one... light pink on white.

We did my MOH's in silver on pink. We were going to write "Maid of Honor" on it but decided that would be way too difficult. At that point "we" had already done 6 so we were also pretty burnt out.

Part II:


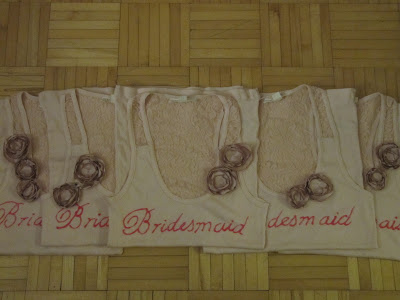
These are the flowers I posted about a while back... which I attached to the tanks!


This one is mine! The paint leaked into the shirt a little and I am not quite sure why. It didn't do it on any of the other shirts.

This is my fabulous Maid of Honor's!


Here are the bridesmaids! I put the flowers in different places so that each one is a little different.

PART III:


I printed these "Will you be my bridesmaid" templates from Wedding Chicks and then cut them into little tags and just hole punched them.

Then I just wrapped a tagged each one!

DONE!

Just took 4.5 months... on to my next project!

You may also like...

Related Posts with Thumbnails