Showing posts with label Cake. Show all posts

Wednesday, July 21, 2010

Nontraditional Tiers...

So I spoke to my wedding planner a few weeks ago and she mentioned that I may not be able to have a three tier cake! She said that if I want to get married on the coast it would be more difficult to transport a larger cake and we may even have to fly someone out to the wedding location to assemble the cake on site.

I know... devastating!

First of all, I have dreamed (dreamt) about a three-tiered wedding cake for as long as I can remember. Second of all, I love the number 3. I think that the best things in life come in threes. (For instance I have two sisters!).

Then I saw these two adorable slightly nontraditional tiered cakes that look like they might be easier to transport.
{Source:GWS}

{source:Wedding Chicks}


How adorable are these cakes? It also seems like they are pretty sturdy three tier cakes, right??

Friday, July 9, 2010

Made for me...

I am usually not a huge fan of the from reality to inspiration vendor faux weddings but then I saw this one which I think was designed just for me! To be honest, I didn't love anything about the bride. Her dress or her veil, she was really a non-factor but then again this is a vendor wedding so it isn't really about the bride anyway.


So I don't love this particular chandelier but I do love chandeliers so this was a go sign. This chandelier is a little country ranch for me and not as romantic as the inspiration board chandeliers (which are EXACTLY the kind of chandeliers I love).

Then I saw the milk and cookies...which is actually kind of funny because my FF has been begging for milk and cookies at the wedding ever since he had them at a wedding reception.

Love the lace around the flowers and the simple monogrammed detail. I don't really have an family heirlooms but if I did I think this would be a great place to add the something borrowed.


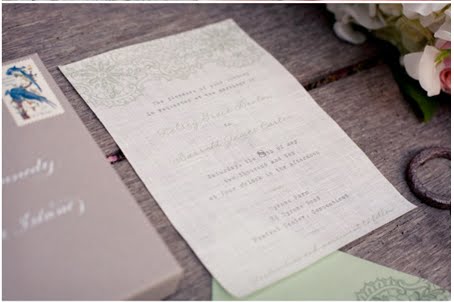
I love love love vintage postage stamps. Another unnecessary but amazingly gorgeous detail. This envelope is so darling. I didn't realize how much calligraphy added to an envelope until I got a recent invitation that was handwritten. (I know... I've become a very judgmental and kind of mean bride-to-be... I'm not sure how it happened.)So after seeing this envelope I immediately googled "calligraphy instructions" thinking I could learn to do my own. Then I also checked out the bio of the calligrapher who did these weddings. Turns out she has 20 years experience and was master trained under some uber famous world class instructors. Did you even know that existed? I was pretty sure that I could just go to Staples or Office Max this weekend and pick up a calligraphy pen and figure it out. I think I still might.


I also LOVE LOVE LOVE the lace detail on all the wedding paper. Here's more of the great lace detail on the invitation. These invitations are from Paper Moss which I am super excited about checking out!


Then there is this awesome. Gorgeous cake! I love the subtle details. The colors are even my favorite wedding colors, white, pink and a hint of sage. Gorgeous-ness!! It also looks a lot like a three tiered cake I blogged about previously. That cake was a little more ornate and didn't have any green which almost makes me like this cake more! Also it's a two-tiered cake which my wedding planner says is a more appropriate size for my wedding party. I am not convinced. I still love the idea of three tiers.


Last but certainly not least are my SHOES!! I've seen these shoes everywhere. They've been in at least three wedding posts since I blogged about them. I like them so much but I'm not sure if I should get them now (keep in mind: I have no dress, no location and no color scheme picked). Their still on piperlime... but will they be in a year??

Saturday, May 8, 2010

Edible Flowers!

On my DIY cake quest, I found these great etsy stores that make floral accessories for an affordable price. According to these lovely ladies, these flowers can be stored in a air tight container for up to a year.
{Sweet Deja Vu}

{Sweet Petal Bakery}

{Sweet Bouquet}

The problem with this find is that I am now pretty sure that I could make these... hehehe. I am so excited for a summer of fondant, and gum paste!

Friday, May 7, 2010

A Stand Worth Taking?


I was talking to my FF about cakes the other day and trying to drag an opinion out of him. (J/K baby, ILU). To my surprise (and horror), he said he hated cake stands. Well his exact words were "That cake is fine, but I don't like that thing its on. would it have to be like that?"

I kind of hate when this happens. I adore vintage pedestal cake stands. They are so precious and really complete the image of my perfect wedding cake. Am I crazy?

If I was having a huge 200 person wedding I would not dream of putting that cake on a stand but I'm not. I'm having a small intimate wedding and I think that a smaller cake deserves to be put on a pedestal so it can get the attention it deserves.


Thursday, May 6, 2010

Inspiration: Caaaaaaaaake

I just finished my last paper!! WHOOOOO-HOOOOOOOOOOO. Tomorrow is my last final then I'll be free to blog to my hearts content until I start work on May 24th.

Since I was taking a short break to eat lunch and get re-caffeinated, I thought I would blog about something I love.... CAKE. Here are some gorgeous cakes that I adore (I apologize for the limited colors/styles... I am extremely biased when it comes to cakes):


Monday, May 3, 2010

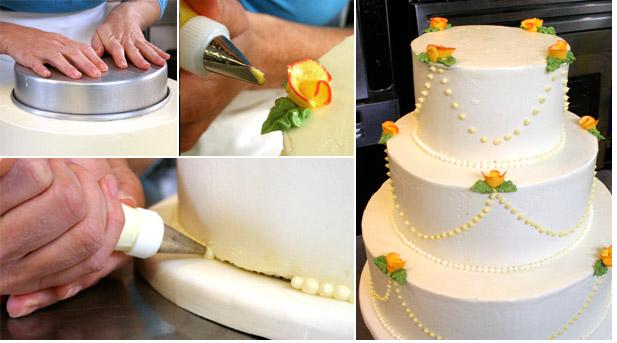
Make your own cake:It can be done!


As I was playing around on the epicurious wedding website I ran across this wonderfully helpful make your own cake guide. If you are brave enough to give a try let me know, I may do a test run this summer and see how it goes. Anyone interest in eating three layers of cake???

Directions for a 3-tier Wedding Cake:


1. Setup
1 day ahead: bake the cakes and assemble and frost each tier separately. (There will be one 12-inch, one 9-inch, and one 6-inch tier.) Chill the tiers for 24 hours to firm them up.

Either 1 day ahead or on the day of decorating: Make the third batch of buttercream and tint as follows: 2 1/2 cups pale-yellow for swag, 1 1/2 cups sage-green for leaves, 2 cups bright-yellow for roses, and 1 cup raspberry-pink for roses. This leaves 2 cups of white buttercream, which will be used to finish the seams on the cake.

2. Measure the tiers for even positioning
Starting with the 12-inch tier, measure 1 1/2 inches from the cake's edge and make a discreet but noticeable mark with a toothpick. Think of this as the 12 o'clock position and repeat at the 9 o'clock position. Measure and mark the 9-inch cake in the same way.

3. Mark the tiers for even positioning
Center an empty 9-inch cake pan over the 12-inch tier, lining it up with the toothpick marks, then gently press pan into the surface. Use an empty 6-inch cake pan to mark the 9-inch cake in the same way.

4. Insert dowels for support
Starting with the 12-inch tier, hold a dowel above the tier 3 inches from the edge and at the 12 o'clock position. Insert the dowel downward all the way into the tier and use a pen to mark where the cake meets the dowel. Carefully remove the dowel and cut 1/8 inch below the mark so that the dowel is just shorter than the height of the cake. Wipe the dowel clean and insert it back into the 12-inch tier. Repeat 3 more times, placing dowels in the 3 o'clock, 6 o'clock, and 9 o'clock positions, making sure to keep each dowel 3 inches from the edge. Repeat on the 9-inch tier, using only 3 dowels, positioning them 2 1/2 inches from the tier's edge, and placing them at the 12 o'clock, 4 o'clock, and 8 o'clock positions. Use buttercream to fill in any holes and smooth any surfaces.

5. Assemble the tiers
For best results, place your base or platter on a cake turntable. Spoon 1 tablespoon of buttercream onto the base and center the 12-inch tier on top. Spoon 1 tablespoon of buttercream onto the top center of both the 12-inch and 9-inch tiers. This will help glue the tiers together. Have an offset spatula ready nearby. Using both hands, hold the 9-inch tier, centered, 1 inch above the 12-inch tier. Carefully removing one hand, allow one edge of the 9-inch tier to gently drop and rest on the 12-inch tier. With the other hand, pick up the offset spatula, slip it under the 9-inch tier next to where you're holding it, and carefully remove your other hand. Using the spatula, slowly lower the tier, quickly sliding the spatula out from underneath at the last moment. Use the same method to place the 6-inch tier on the 9-inch tier.

6. Finish the seams
Fit a pastry bag with a #6 round tip and fill the bag with white buttercream. Pipe small dots along the seams between the cake tiers and along the seam where the bottom tier meets the base. Try to keep the dots uniform in size and shape, and pipe dots as close together as possible so there are no gaps.
{For complete directions click here and for video instructions click here}

Thursday, April 22, 2010

Cake: Wedding Cake Pops

In addition to all the other things I claim to love, I LOVE cake, and I LOVE baking. While there seems to be a general consensus that you should not bake your own wedding cake, I am not entirely convinced that it wouldn't be super fun. Regardless I really hope to be able to do a lot of the baking for my own wedding.

Here is a great DIY dessert idea from Bakerella.....there's even a surprise ending!!

Saturday, April 17, 2010

Today on Rue La La

Since coming to NY I have become addicted to online shopping. Some of my favorite sites include Gilt, Ideeli, Haute Look, and Rue La La.

Now that I am wedding planning, I always keep an eye out for good deals on dresses (potential bridesmaids dresses), vacations on jetsetter (potential wedding locations) and everything in between.

Today on Rue La La, I found these adorable pedestal stands from Rosanna.


Unfortunately I got there too late to get the one I want :( but they do have a wedding registry...:D

Happy Saturday!

You may also like...

Related Posts with Thumbnails